
The Sungrow inverter WiFi setup allows your solar inverter to connect to the iSolarCloud monitoring platform using a WiNet dongle. This enables real-time monitoring, remote diagnostics, and performance reporting directly from your smartphone or computer.
Sungrow’s latest WiNet SmartConfig function makes connecting faster, smoother, and more reliable than ever before.
Article Content
What You’ll Need Before Setup
Before starting, make sure you have the following:
- A Sungrow inverter (e.g., SG285HX / SG320HX / SG333HX / SG350HX)
- A Sungrow WiNet dongle
- The iSolarCloud app (download from the App Store or Google Play)
- A 2.4 GHz WiFi network (WiNet does not support 5 GHz signals)
- Your home WiFi name (SSID) and password
Step-by-Step Sungrow Inverter WiFi Setup Guide
Follow these exact steps to connect your Sungrow inverter to WiFi and start monitoring through iSolarCloud:
Step 1: Connect to Your Home WiFi
Ensure your mobile device is connected to your home’s 2.4 GHz WiFi.
Example: Connect to Home0692, not Home0692-5G.
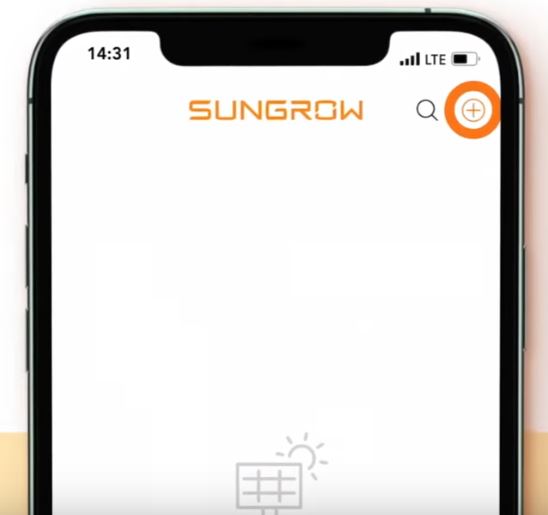
Step 2: Launch iSolarCloud App
- Open the iSolarCloud app.
- Log in or create an account.
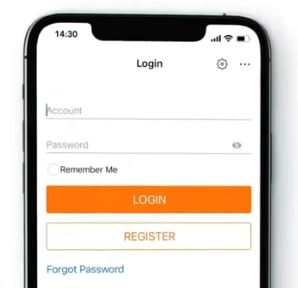
- Tap the “+” icon (top right corner) to create a new plant.
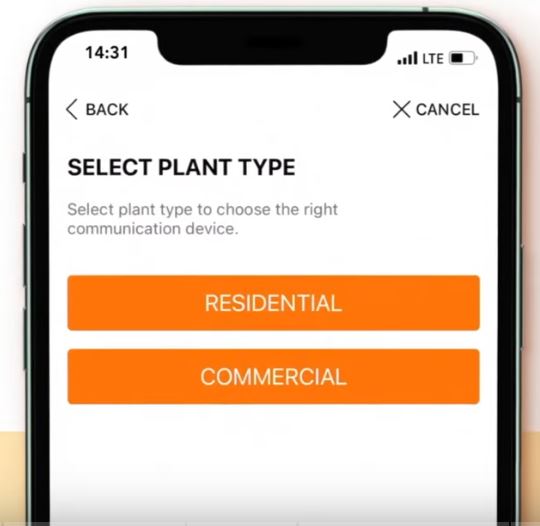
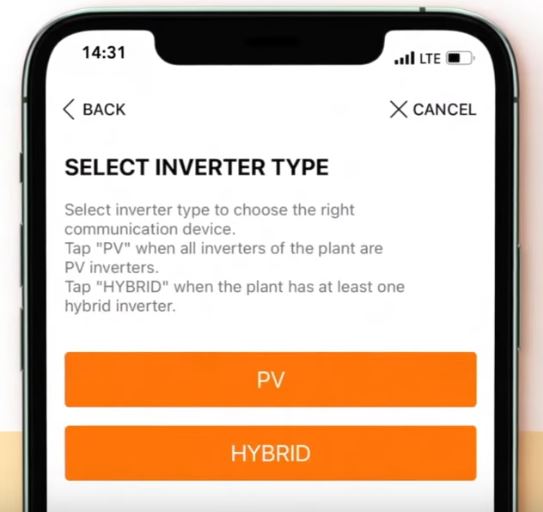
Step 3: Create Plant Configuration
- Select Residential as the plant type.
- Choose PV as inverter type.
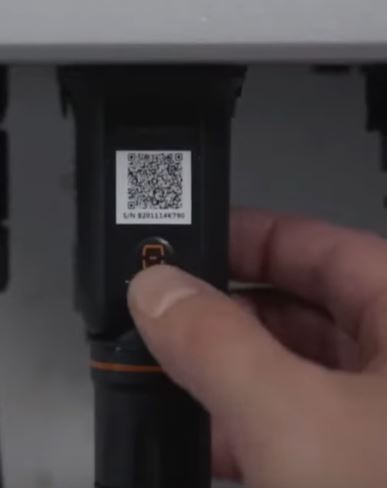
Step 4: Scan the WiNet Dongle QR Code
- Scan the QR code on the front of the WiNet dongle.
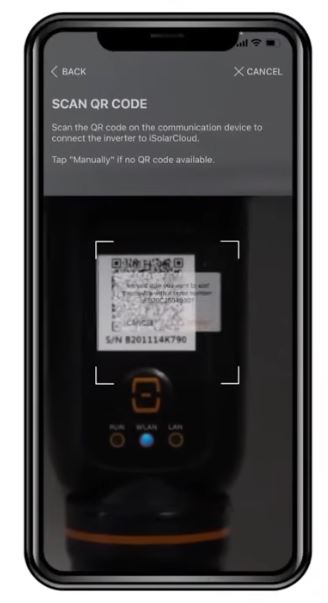
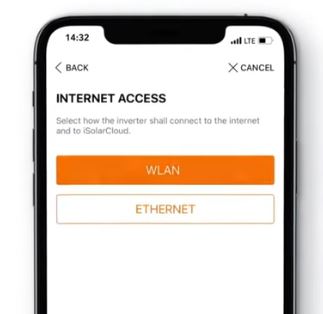
- Select WLAN as internet access.
- The app will detect the device and display EasyConnect Instructions.
Step 5: Enable SmartConfig Mode
- Press the Multifunctional Button on the WiNet dongle once to activate SmartConfig mode.
- Tap Next on the iSolarCloud app.
Step 6: Enter WiFi Credentials
- Enter your WiFi name and password carefully.
- Confirm details, then tap Next.
Step 7: Connect and Complete
- Wait 15–20 seconds for the app to confirm the connection.
- Once successful, the app displays “Connected Successfully.”
- Tap Complete to finish the configuration.
Your Sungrow inverter is now online and visible in your iSolarCloud dashboard.
Common WiFi Setup Problems & Fixes
| Issue | Cause | Fix |
|---|---|---|
| ❌ WiNet not connecting | 5 GHz network selected | Reconnect to 2.4 GHz network |
| ⚠️ “Failed to connect” message | Incorrect WiFi password | Re-enter correct credentials |
| 🔁 Dongle not responding | Not in SmartConfig mode | Press Multifunction Button once |
| 📡 Weak signal | Inverter far from router | Move router closer or add WiFi extender |
| 🚫 Device not visible on app | App permissions denied | Allow iSolarCloud to access Location & Camera |
How to Confirm Successful WiFi Connection
Once connected:
- Open iSolarCloud → Tap your Plant Name
- Check the inverter’s online status (should show “Connected”)
- You can now view:
- Live power generation
- Historical performance data
- Fault logs
- Firmware update options
WiNet Device Indicator and Button Guide
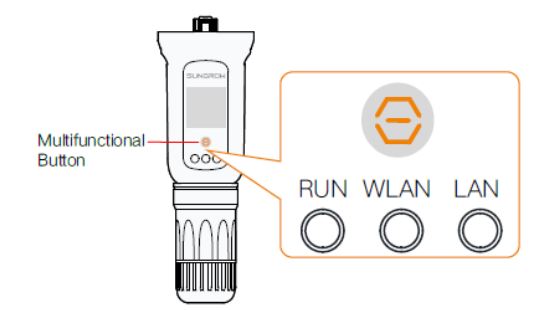
RUN Indicator
- Off: Indicates the device is not connected to an external power supply.
- Blinking green: Signifies normal operation.
- Steady red: Denotes a module fault.
WLAN Indicator
- Off: Suggests no data exchange.
- On: Indicates WiFi is connected, but no data exchange is occurring.
- Blinking slowly: Represents active data exchange.
- Blinking quickly: Indicates the device is in SmartConfig mode (factory default mode).
LAN Indicator
- Off: Indicates no data exchange.
- Steady green: Shows the Ethernet is connected, with no data exchange.
- Steady green, blinking red: Signifies the device is in data exchange.
Multifunctional Button Operations
- Press once: Turns the device on or off, enabling SmartConfig mode.
- Press 3 times: Turns on WiFi hotspot with password-free access by default; valid within 30 minutes. WiFi hotspot can be turned on only, turning off is unavailable.
- Press and hold for 5s: Restores factory default settings.
This status guide helps users quickly assess the device’s connectivity and operational health.
Pro Tips for Reliable Sungrow WiFi Setup
- Use a 2.4 GHz-only SSID (disable 5G if needed during setup)
- Keep inverter within 10 meters of the router
- Avoid metal obstructions between the inverter and WiNet dongle
- Regularly update iSolarCloud app and inverter firmware
- Enable automatic reconnection in router settings
Sungrow WiFi Setup FAQs
Can I connect Sungrow inverter via Ethernet?
Yes. Certain models (like Sungrow SG series) support Ethernet or RS485 connections for stable data transmission.
Does Sungrow WiFi work without the iSolarCloud app?
No. The iSolarCloud app is required for registration, configuration, and monitoring.
What if I replace my home router?
You’ll need to reconfigure the WiFi setup in the iSolarCloud app using the same steps above.
Setting up your Sungrow inverter WiFi connection takes less than 10 minutes with the WiNet SmartConfig process. By following the steps above, you can ensure a stable, monitored solar energy system — maximizing efficiency and uptime.